Ultimate Guide to Photoshop Layer Styles: Add Texture, Sparkle, Gold, & Metallic Effects to your Designs & Illustrations + Free Download
Hello my friends and fellow creators! Layer styles are an amazing way to add texture, sparkle, depth, gold, metallic effects, and more to your illustrations and designs. Even though NOW I'm more known for my innovations in Photoshop brushes, I actually made my name with my trendsetting layer styles. In 2014 I released Instagram, which sparked a gold foil trend that is still going strong years all these years later. Now, years later, I have lots of different layer styles collections, and they are all unique and meticulously crafted, with my signature eye for detail!
So, no matter which styles collection you are working with, the following foundation videos and tutorials will show you all of the basics you need to know to get you started having fun with layer styles.
This is a great resource if you are new to this brush technique, or even just if you need a bit of a refresher.
I'm going to go over all of the foundations of working with my popular layer styles! Layer styles are an amazing way to add texture, sparkle, depth, gold, metallic effects, and more to your illustrations and designs.
In this tutorial, I show you how to load Layer styles into Photoshop, so that you can instantly add texture, sparkle, depth, gold, and metallic effects to your illustrations and designs.
In this tutorial, I show you how to apply Photoshop layer styles to achieve instant texture, sparkle, and metallic gold effects. I also show you how to apply the 'Color' styles that take the color from the object you are applying the layer style to.
In this tutorial, I share one of my favorite tips, which is to apply the layer style to the Photoshop layer before you even start painting. This will give you a much better idea of how your design or illustration will look when finished, and you can always change the layer style at any time.
In this tutorial, I show you how to use my free Color Add-On Layer Styles to change my metallic gold layer styles to different variations, such as rose gold, silver, copper, and more! Download the free Color Add-On Layer Styles HERE.
In this tutorial, I show you how to resize the Photoshop layer styles using my actions, as well as how to do it manually. This allows you to adjust the effect to suit your artwork or design. Download the free 'Re-size" Actions HERE.
In this tutorial, I will show you my layer styles organization tips and how to load your styles instantly into your Photoshop Creative Cloud libraries thanks to a specially designed swatch PSD file I have created.
I hope you enjoyed this series of videos! Below are some more details about this technique, as well as some additional tips and tricks!
3 easy steps to using Photoshop Layer Styles to enhance your designs and illustrations
Step 1: Install the Photoshop Layer Styles
Layer Styles are SO easy to load and use, and can be an easy and practical way to add AMAZING effects to your graphic design and illustration projects! Download the zip file containing your styles and unpack the contents of the file. This will reveal a new folder containing a few other files, one of which is an .ASL file.
3 Ways to install Photoshop ASL Layer Styles:
- Most of the time, you can simply double click on the .ASL file included in your download package to install the layer styles. First, make sure Photoshop is open. If this doesn't work, don't stress! This simply means that your computer hasn't set Photoshop as the default program for opening this type of file. Simply use one of the other methods below!
- You can also drag the layer style ASL file icon onto the Photoshop application icon or open window to load the layer styles.
- Alternatively, you can open the Styles window (Windows > Styles), click on the menu in the top right corner, and select Import Styles. Then navigate to your download location and select the ASL styles file.

And that's really all you have to do! Now your styles are loaded into Photoshop and ready to use.
Step 2: Select the layer you want to apply the effect to
So now you have your layer styles loaded and are ready to have some fun! You can apply the layer styles to all kinds of layers -- text layers, shape layers, and raster layers! So now, you just need to select the layer you want to apply the effect to. You can do this via the layer panel, or using the Direct Selection or move tool to select your layer.
Step 3: Click on the Layer Styles to Apply the Effect
After you have selected your layer, then just select which layer style you want to apply in your Styles panel, and voila! Enjoy the effects! Below are some additional tips and tricks for working with metallic gold styles especially!

Applying the Gold, Foil, & Glitter Effects in Gold vs Color
As you might know, many of my Photoshop Layer Styles have both a GOLD and a COLOR version. This is to allow for maximum versatility and also not to bloat your photoshop with tons of unnecessarily styles! Many of the gold and foil photoshop layer styles collections out there on the marketplaces are in fact just a FEW different patterns re-saved in various colors or shades of gold. This is really unnecessary and can slow down your Photoshop if you have all of these styles loaded at once!
When you want to get a desaturated gold, rose gold, copper, or silver effect, first begin by using the GOLD version of the style and applying it to your layer. It does not matter what color your object is that you are applying your layer style to. The gold version has the carefully designed pattern applied as an overlay with normal blending mode, meaning it covers the layer and it does not matter what color the layer is beneath. Once you apply the style in GOLD, you can adjust it to desaturated gold, rose gold, copper, or silver. Instructions for that are below!
The COLOR version of the style is pretty much self explanatory. This style uses whatever color you have as a BASE and applies the pattern using a luminosity blend mode to achieve the gold, foil or glittery effects in whatever color your object is. So for example, if you are applying a glittery style from Creative Couture to a purple layer, that layer will then become glittery purple once you apply the layer style.
Create Rose Gold, Silver, & Copper Styles via the Color Add-On Styles!

Why bog down photoshop with the exact same styles (aka patterns) in different tones? With the Color Add-On Styles, you can colorize existing GOLD styles to desaturated gold, rose gold, copper, silver, and natural gold with a single click!
Download the free Color Add-On Layer Styles HERE.

To adjust the gold styles, simply select the layer that has the gold layer style already applied. Then, you want to locate the Color Add-On Style you want to apply in your layers panel.
Do not simply click this style, because then it would REMOVE your current style and apply the new color overlay. Instead, you need to first make sure you have both your LAYERS panel AND STYLES panel open. Then, you need to hold down the SHIFT key and use your cursor to DRAG the color overlay Style onto your gold layer in the layer panel. Now the color adjustment style will be applied on top of your gold pattern overlay style! Gold becomes rose gold or copper or silver, etc.!
Resizing the Layer Styles
One of the cool things about the layer styles is that you can easily resize the pattern of the layer style so that it best suits your artwork or design. I've created some actions in photoshop that let you do this with just a click. Click HERE to download my Free Resize Actions .ATN file.
To load the actions (.ATN) file, you can open the Actions window (Windows > Actions), click on the menu in the top right corner, and select Load Actions. Then navigate to your download location and select the ATN styles file. The actions allow you to resize the styles UP and down in increments of 50%, which looks best. To run the actions, simply select your layer with the style applied. Then you select the action in the actions panel (either Resize UP or Down) and then click the play icon at the bottom of the Actions window.
Photoshop Layer Styles (.ASL) Organization Tips
I get a lot of requests on how I organize my Photoshop Layer Styles. Depending on the kind of work you do and your workflow, I definitely recommend using the folders feature in the Photoshop brush panel, and organizing them in a way that works best for YOU.
Photoshop Layer Style Organization Tip #1: Only load what you need
We always want to pay attention to our presets organization, and not 'overload' our Photoshop with every single preset we have ever purchased, because eventually that can slow it down while you are working, or even crash your Photoshop. To keep Photoshop light and nimble, I strongly recommend just keeping the Layer Styles you use frequently loaded into the Styles window, or simply load them on a project basis as you need them.
If you are using a newer version of Photoshop, be sure to take advantage of the FOLDERS feature, which allows you to group your palettes together for better organization. By default, when you import a Styles collection, it will be saved in its own folder.
What I personally do, is I leave a FEW styles from each collection always loaded into my Styles window, and I make sure they are a good representation of a nice variety within that collection. I will use this styles 'on the fly' as I am creating, and THEN I can go back later on and fine tune EXACTLY which style I want from that entire collection, which I just happen to keep in my Photoshop LIBRARIES! Read the scoop below about how I use Photoshop Libraries to keep my full styles collections organized!

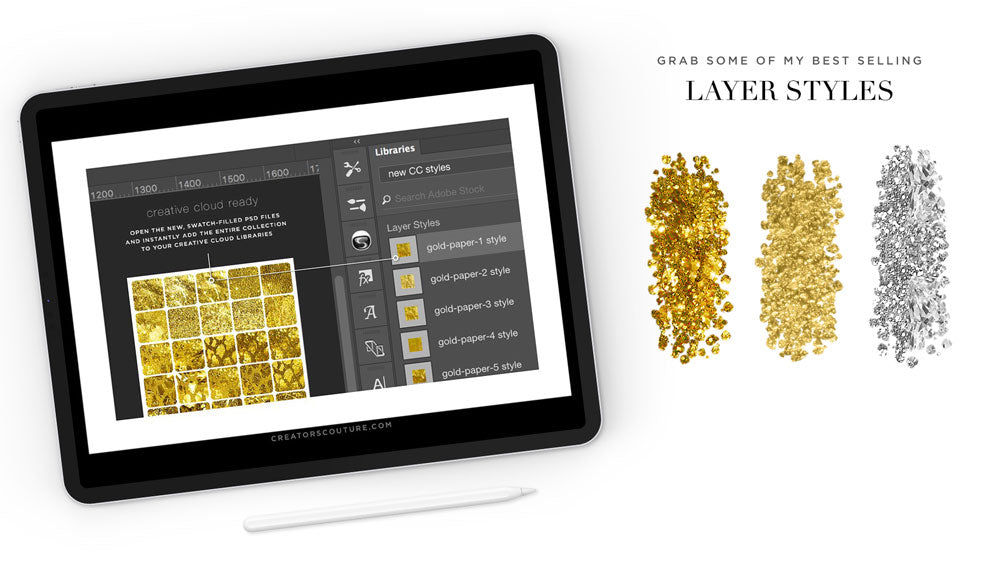
Photoshop Styles Organization Tip #2: Upload your Layer Styles collections to Photoshop Creative Cloud LIBRARIES
You're going to need to sit down for this! Not only have I crafted you hundreds of completely unique, meticulously crafted layer styles, but I've done ALL of the tedious work so that you can upload the ENTIRE collection to your Photoshop Creative Cloud libraries with a single click! This is HUGE! (For most collections), I've created these 'swatch' PSD files which have each and every layer style in the collection applied to a tiny swatch. Not only that, I took the time to NAME every single layer. This means that when you create a new Photoshop Library from this document, each and every style of this collection will be saved as a layer style in the library AND be appropriately named!

How to load your Layer Styles collection into a Photoshop Creative Cloud Library?
Simply open your Creative Cloud Libraries window. (Windows > Libraries). Make sure your Swatch PSD document is open and active. Click the + Icon at the bottom of the window. Select 'New Library from Document'. A window will appear and make sure ONLY 'Layer Styles' is checked. Click the button at the bottom that says 'Create New Library'. It's done! Now all of your Layer Styles are loaded into their own Creative Cloud Library, and you can access them at any time!

Photoshop Layer Styles Organization Tip #3: Keep a master folder of your Layer Styles by Creators Couture
I have a lot of my community asking me about Photoshop organization. With regard to Layer Styles, I recommend creating one master folder for all of your styles. A lot of you have many of my various styles sets and collections, and this way, you can keep them all together in one central repository and access them when you need them, instead of keeping them scattered around your hard drive! Personally, I don't even load them in the folder within the Photoshop application folder. I keep them in a handy location on my hard drive.

So there you have it! I hope you enjoyed this comprehensive guide to understanding working with Photoshop Layer Styles! If you like this kind of content, be sure to sign up for my (usually weekly) newsletter. Newsletter Insiders get first peeks at my latest creative collections, VERY special pricing (if you know, you know!), exclusive FREEBIES, and more! Happy creating! xx Jessica
Download some of my best Photoshop Layer Styles
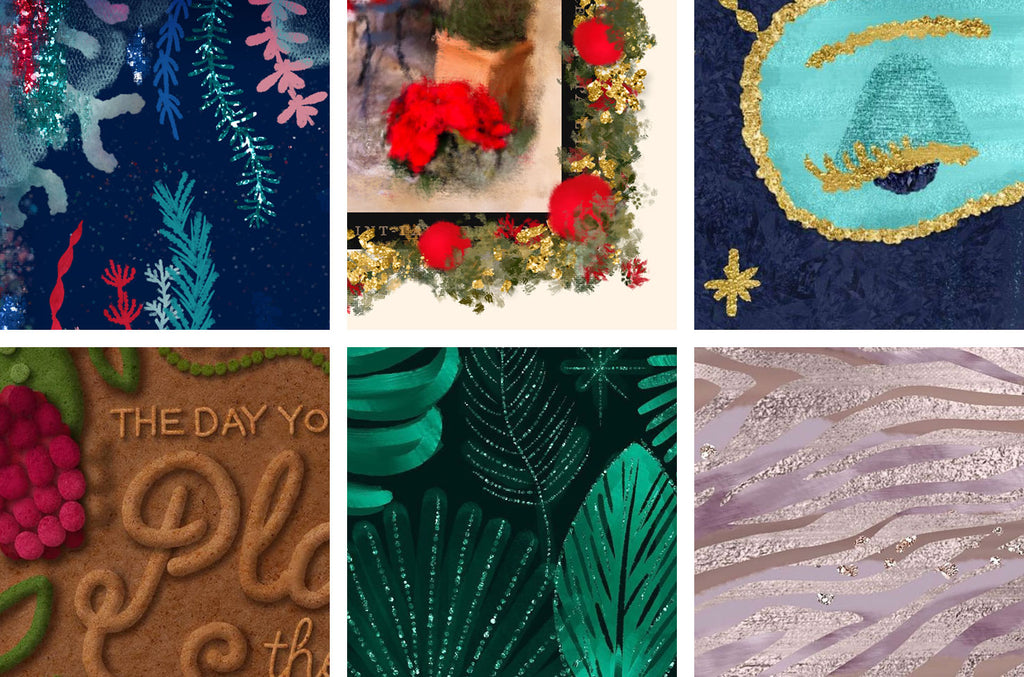
Layer styles are where I 'made my name', starting with the original Instaglam, which sparked a gold foil trend that is still going strong years later. My layer styles are meticulously crafted, and I use them daily in my design and illustration workflow Each style is truly unique - they're not just re-colored versions of the same style, like you see on so many collections! I hand-picked my very favorite styles from my 24K Gold wet paint collection, the original InstaGlam collection, Frosted + Frozen collection, and my fashion-inspired Creative Couture Collection!
The Photoshop Layer Styles in action
Download a sampler of my Best-Selling Layer Styles

Get a Creative Jump Start with the Whole Shop Bundle
You can get every resource I've created to date for an absolutely ridiculous price. A world of creativity awaits! Don't take my word for it... read some of the customer reviews and see what your fellow creatives are saying!